
Installing SSL certificates may become a tedious task. Especially if you are a beginner, it can be a headache. The process varies on different server types and the software your server is running on. For those who are still struggling to install an SSL certificate on their web server, we have prepared an in-depth article covering almost of the major platforms. These methods will allow you to easily apply SSL on your website without sweating much. Make sure that you choose the method which works on your server.
Table of Contents
How to install SSL on cPanel?
cPanel is one of the widely used web hosting interfaces which is incredibly easy to use and flexible as well. To install an SSL certificate using cPanel, follow these steps.
Before starting the process, make sure that you have already generated the CSR from your cPanel. Also, make sure that you have received your certificate from your SSL certificate provider.
- Login to cPanel.
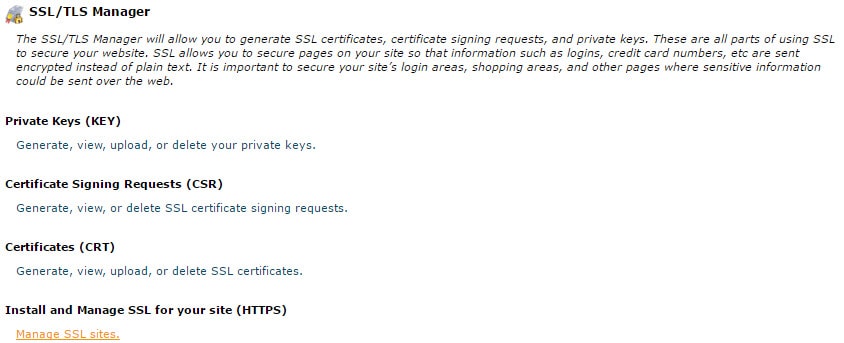
- Click on SSL/TLS Manager option located in Security section (If you can’t find it, just search in the search box.)

- Click on Manage SSL Sites option under Install and Manage SSL for your website (HTTPS) section.
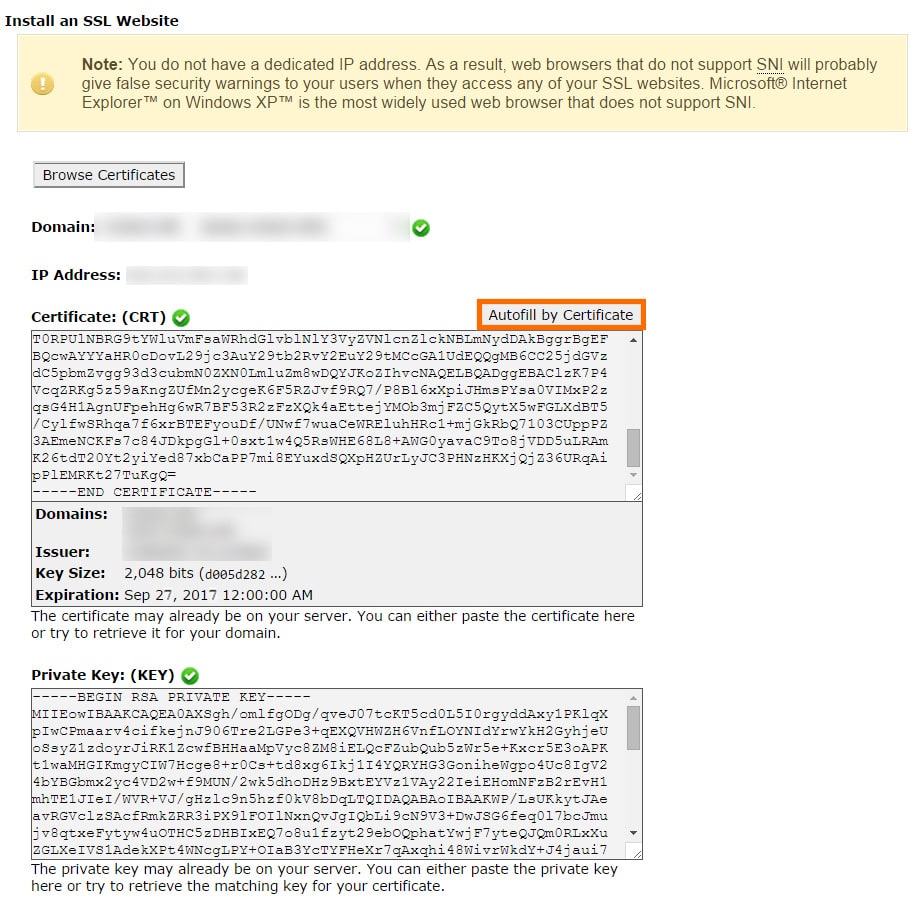
- Copy the certificate code you received from the Certificate provider through email or other methods and paste it on the next screen under correct sections. Usually, a file with the name *example.com*.crt include your certificate keys to copy.
- Then, click on the Autofill by Certificate button, which appears next to the certificate that you just entered, and the system will attempt to fetch the details such as the domain name and private key. If it fails to fetch the details automatically, choose the domain from the drop-down list and manually enter the certificate and private key into the corresponding boxes (You can find the private key in your SSL/TLS Manager screen on the screen.
- Now, copy-paste the chain of intermediate certificates (CA Bundle) into the box under Certificate Authority Bundle (CABUNDLE). Tick the checkbox ‘Enable SNI for Mail Services’ only if you want to use this certificate for Mail Services.
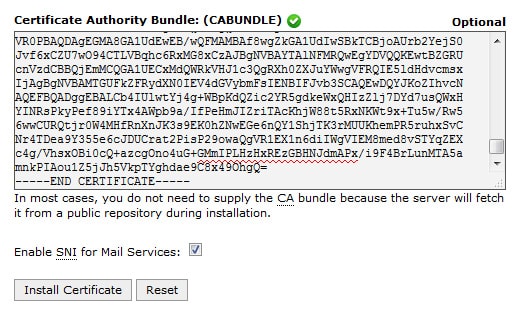
- Finally, click on the Install Certificate button.
That’s it, your SSL certificate is now successfully installed on the server for your website. Check it yourself by trying to access your site view https://example.com.
How to install SSL on WHM?
Web Host Manager is an application that allows you to control your VPS with ease. Here is how you can install an SSL certificate on WHM –
- Log in to your WHM account.
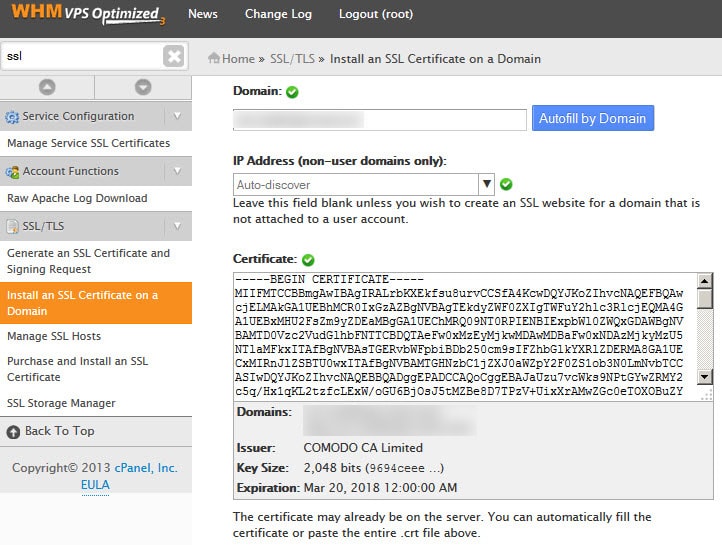
- After logging in, search for an option namely, Install an SSL certificate on a domain name. You could either browse manually or use the search box.
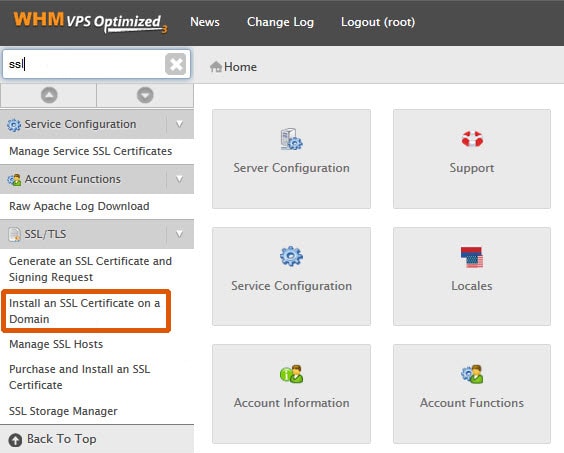
- A new screen will show up with the options such as Domain, Certificate, Private Key and Certificate Authority Bundle. Fill all those details.
- Domain: The domain which the SSL issued for.
- Certificate: The certificate that you received from the registrar (Usually comes like example.com.crt).
- Private key: The CSR that you have generated recently.
- Certificate Authority Bundle: It will also be included with the certificate (Usually will be like .ca-bundle).
- Only check the Enable SNI for Mail Services if you need SSL for mailing services.
- Click install button.
- That’s it, you’ve successfully installed SSL on WHM.
How to install SSL on Plesk?
Plesk is widely used to build secure web servers with a wide control over the machine utilizing its fruitful features. These are the steps to install SSL on a Plesk server –
- Log in to Plesk Panel.
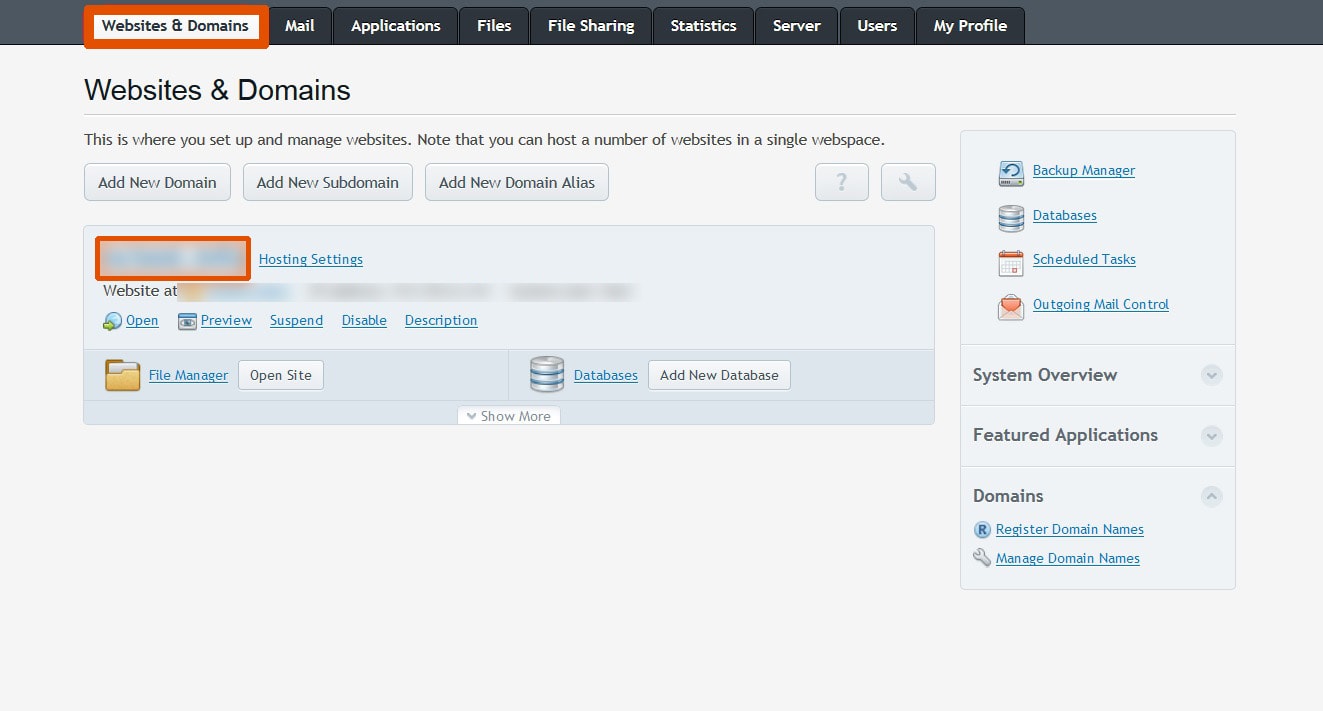
- Go to the Websites & Domains tab and select the domain you want to secure.
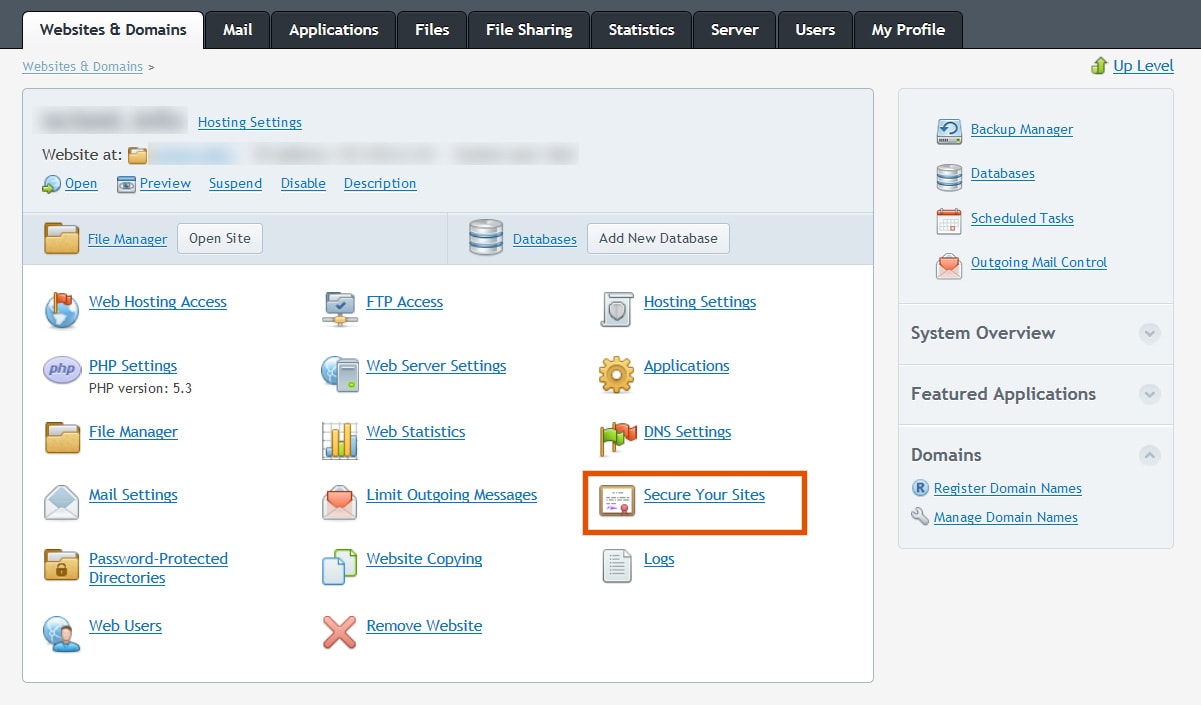
- Click the Secure Your Sites option.
- Select the SSL certificate that was created during the CSR code generation. You could easily identify it by the domain name. If your Private Key and the CSR was not generated on the Plesk, click on the Key icon near the domain name and upload the private key.
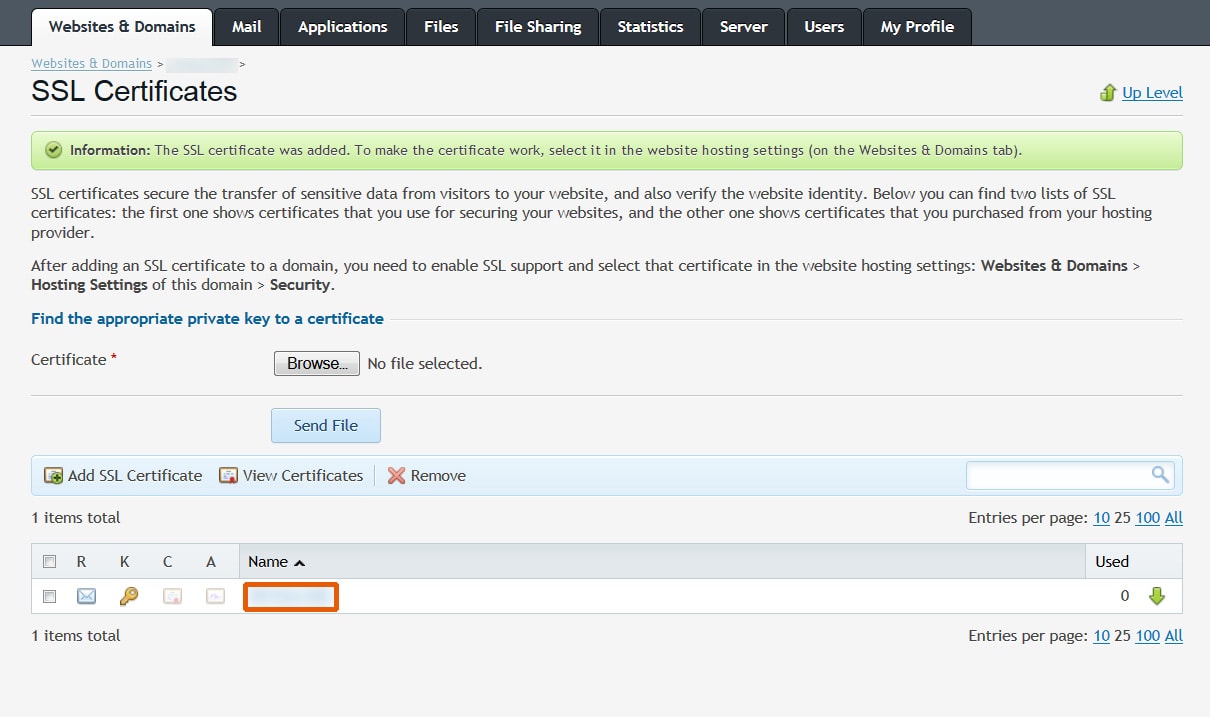
- On the next page, click on the Browse button under Upload Certificate Files section and locate the certificate and the CA bundle files.
- After both files are chosen, click on Send Files.

You could also copy-paste the certificate and the CA bundle into the Upload the certificate as text section and click on Send Text.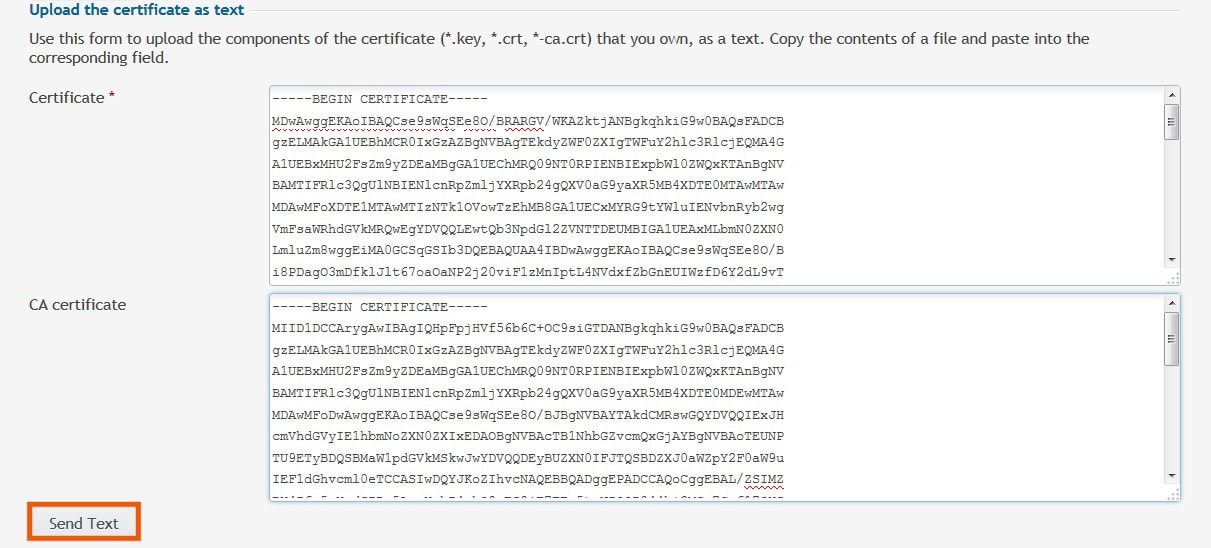
- Go back to the Websites & Domains tab.
- Click on Hosting settings next to your domain name.
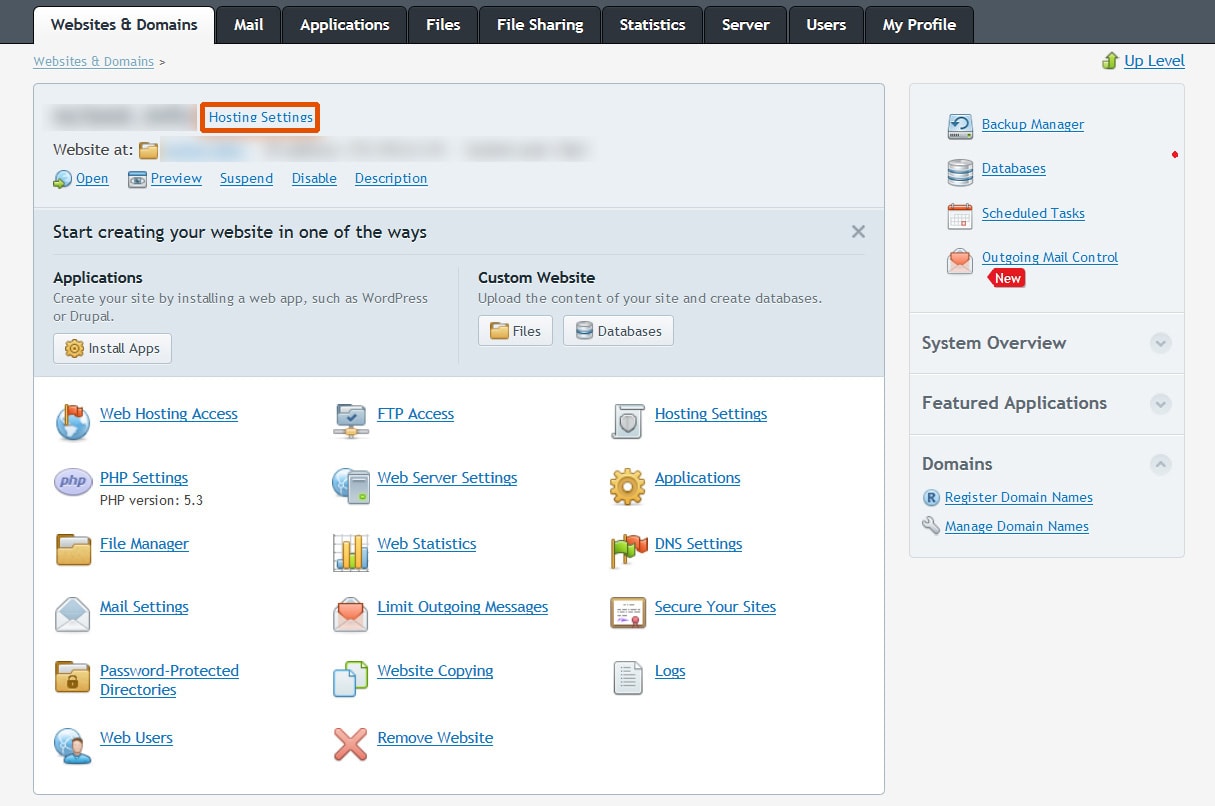
- A new page will show up. In the Security section, select the certificate and check the SSL Support checkbox.

- Finally, click OK at the bottom.
- That’s it, you’ve successfully installed SSL certificate on Plesk.
How to install SSL on Apache?
Apache is a popular web server that powers more than 30% of the web servers as of 2022. These are the steps to install an SSL certificate on Apache –
1. Upload the certificate to the server
You might have received two files (In most of the cases) as *yourdomain*.crt and*yourdomain*.ca-bundle from your SSL provider. Some of them may also send the CA bundle as separate files like COMODORSADomainValidationSecureServerCA.crt, COMODORSAAddTrustCA.crt, AddTrustExternalCARoot.crt.
2. If you received the CA certificates as separate files, combine them into a single file
Otherwise, skip this step. In our case, we are using the Comodo PositiveSSL CA certificate. So, we received three files as: COMODORSADomainValidationSecureServerCA.crt, COMODORSAAddTrustCA.crt, and AddTrustExternalCARoot.crt.Run this command in the terminal for combining them into a single file named bundle.crt:
cat COMODORSADomainValidationSecureServerCA.crt COMODORSAAddTrustCA.crt AddTrustExternalCARoot.crt >> bundle.crt3. Edit the Apache VirtualHost file
Do not copy-paste these lines, the final code example is shown below. As it varies server to server, it needs a little explanation.
- The location of the Apache configuration file varies server to server. For the Fedora/CentOS/RHEL it will be on /etc/httpd/conf/httpd.conf. For the Debian and Debian based servers, it will be on /etc/apache2/apache2.conf. The name of the configuration file may also vary as httpd-ssl.conf, ssl.conf, and default-ssl.conf.
- You should add a record for port 443 in your VirtualHost. If your server running Ubuntu on Apache the configurations for 443 and 80 ports for each site are located in separate files. You can find it at /etc/apache2/sites-enabled/. Edit or create the file with the VirtualHost for 443 port to set up the secure connection. Simply copying the port 80 file and changing the port to 443 will do the trick. After changing the port, these are the lines to add in the file.
- SSLEngine on – To turn on the SSL.
- SSLCertificateFile should be pointed to the certificate file that is issued for your domain name.
SSLCertificateFile "/ssl/*yourdomain*.crt"
- SSLCertificateKeyFile should be pointed to the Private Key, which has been generated with the CSR code that you have used for the activation of the certificate.
SSLCertificateKeyFile "/ssl/*your_private_key*.key"
- SSLCACertificateFile should be pointed to the file with combined CA certificates. In the example, we have combined CA certificates in the file bundle.crt In the older Apache versions (2.4.8 and earlier), the directive might be called SSLCertificateChainFile instead.
SSLCACertificateFile "/ssl/bundle.crt"
The complete VirtualHost record for port 443 may look like this (Remember, this is just an example.)
Listen 443
<VirtualHost _default_:443>
    DocumentRoot "/var/www"
    ServerName *your_domain*
    SSLEngine on
    SSLCertificateFile "/ssl/*your_domain*.crt"
    SSLCertificateKeyFile "/ssl/*your_private_key*.key"SSLCACertificateFile "/ssl/bundle.crt"
</VirtualHost>
4. Reload Apache
Finally, save the file and reload the Apache server with the following command
sudo service apache2 reloadIn the case of using a multi-domain or wildcard certificates, you have to modify the configuration files for each domain/subdomain. Also, you have to specify the domain/subdomain you need to secure and refer to the same certificate files in the VirtualHost record using the same steps described above.
How to install SSL on Nginx?
This guide will assist you in the installation of your SSL certificate on Nginx. We have used a Comodo PositiveSSL as an example below. However, the steps remain the same for all SSLs.
1. Upload the certificate to the server
You will receive two files from your SSL service provider (In most of the cases) as *yourdomain*.crt and*yourdomain*.ca-bundle from your SSL provider. Some of them may also send the CA bundle as separate files like COMODORSADomainValidationSecureServerCA.crt, COMODORSAAddTrustCA.crt, AddTrustExternalCARoot.crt. Install both of them to an appropriate place on your server where the user has read permissions.
2. Combine all the certificates into a single file
Unlike Apache, the Nginx required to have all the certificates (one for your domain name and 3 CA certificates) combined in a single file. The certificate for your domain should be listed first in the file, followed by the chain of CA certificates. Here is an example of the code (We used the positive SSL from Comodo).
cat *yourdomain*.crt ComodoRSADomainValidationSecureServerCA.crt COMODORSAAddTrustCA.crt AddTrustExternalCARoot.crt >> cert_chain.crtIf you have a complete CA Bundle file, replace the last three separate file names with the name of your CA Bundle file. It will look something like this.
cat *yourdomainname*.crt *yourdomain*.ca-bundle >> cert_chain.crt3. Edit your Nginx VirtualHost file
By default, the configuration file is named nginx.conf and placed in any of the /usr/local/nginx/conf, /etc/nginx, or /usr/local/etc/nginx directories. If you are using separate configurations for your websites, you can find it under /etc/nginx/sites-available/example.
- Add a port for 443 in your VirtualHost (If you do not have already). Just duplicate the record for port 80 (It will be in VirtualHost file by default) and change port 80 to port 443. Then, simply add it below the non-secure module. After adding the port, here are the lines which you should add in the port 443 block.
- ssl on – To turn on the SSL.
- ssl_certificate should be pointed to the file with combined certificates in step 2.
ssl_certificate /etc/ssl/cert_chain.crt;
- ssl_certificate_key should be pointed to the Private Key generated with the CSR code from your hosting panel.
ssl_certificate_key /etc/ssl/*your_private_key*.key;
Completed VirtualHost record for port 443 may look like the one below:
server {
     listen 443;
     ssl on;
     ssl_certificate /etc/ssl/cert_chain.crt;
     ssl_certificate_key /etc/ssl/yourdomainkey.key;
     server_name yourdomain_com;
     access_log /var/log/nginx/nginx.vhost.access.log;
     error_log /var/log/nginx/nginx.vhost.error.log;

     location / {
         root /var/www/;
         index index.html;
     }
 }
Once you made the changes, be sure to save it. You should also make sure that the configuration file has no errors by running the following command.
nginx -t4. Reload Nginx
Use the following command to reload Nginx server to apply the changes.
nginx -s reloadIn the case of using a multi-domain or wildcard certificates, you have to modify the configuration files for each domain/subdomain. Also, you have to specify the domain/subdomain you need to secure and refer to the same certificate files in the VirtualHost record using the same steps described above.
How to install SSL on IIS 7?
To install an SSL certificate on IIS 7 server, we are going to use the Internet Information Services Manager or simply the IIS Manager. Here are the steps.
- Open the IIS Manager by going to Start > Administrative Tools > Internet Information Services (IIS) Manager.
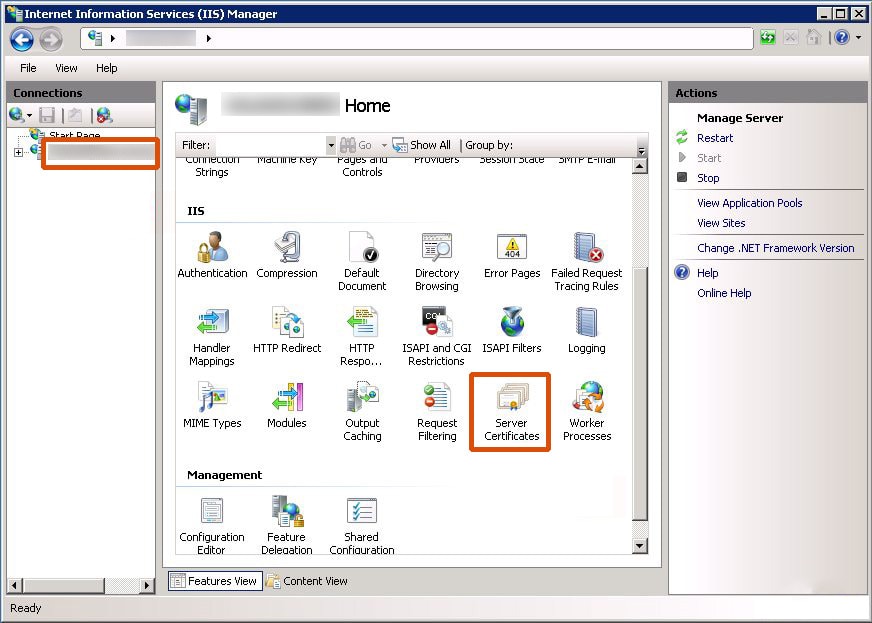
- Click on the Server Name on the left panel.
- Then, double-click on the Server Certificates option displayed on the right side.
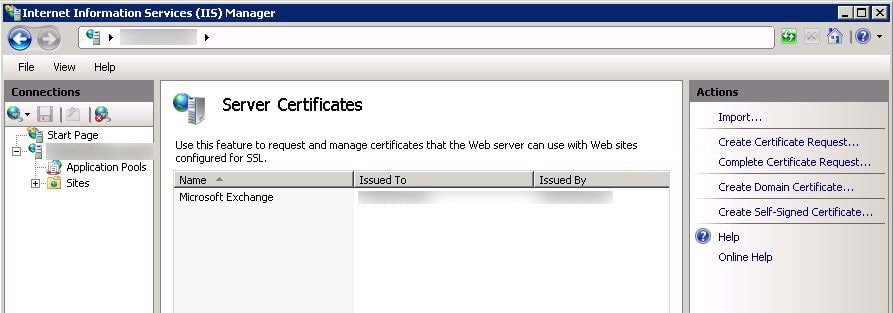
- Click on the Complete Certificate Request option at the right Actions section.
- Now, the Complete Certificate Request wizard window will open up. There, browse the validated certificate file location. Also, choose a Friendly name for your certificate, which helps you to quickly identify the certificate. You could type anything. If, you face any problems during the certificate importing, read IIS7 certificate issue fixes.
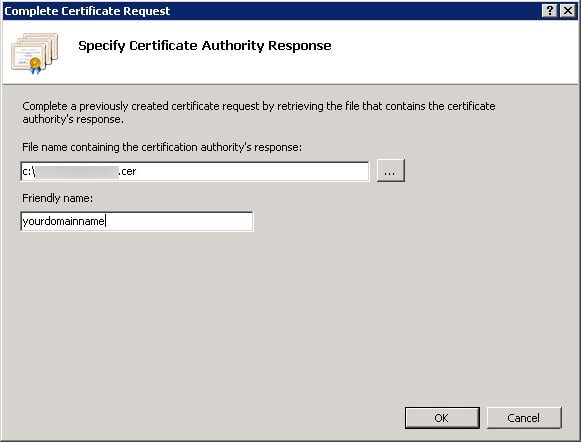
- After successfully adding the SSL certificate, you have to bind it with the website. To do this,
- Open the IIS Manager screen and select the website you want to apply the certificate to.
- Click on the Bindings option from the Edit Site submenu placed under the Actions section on the right sidebar.
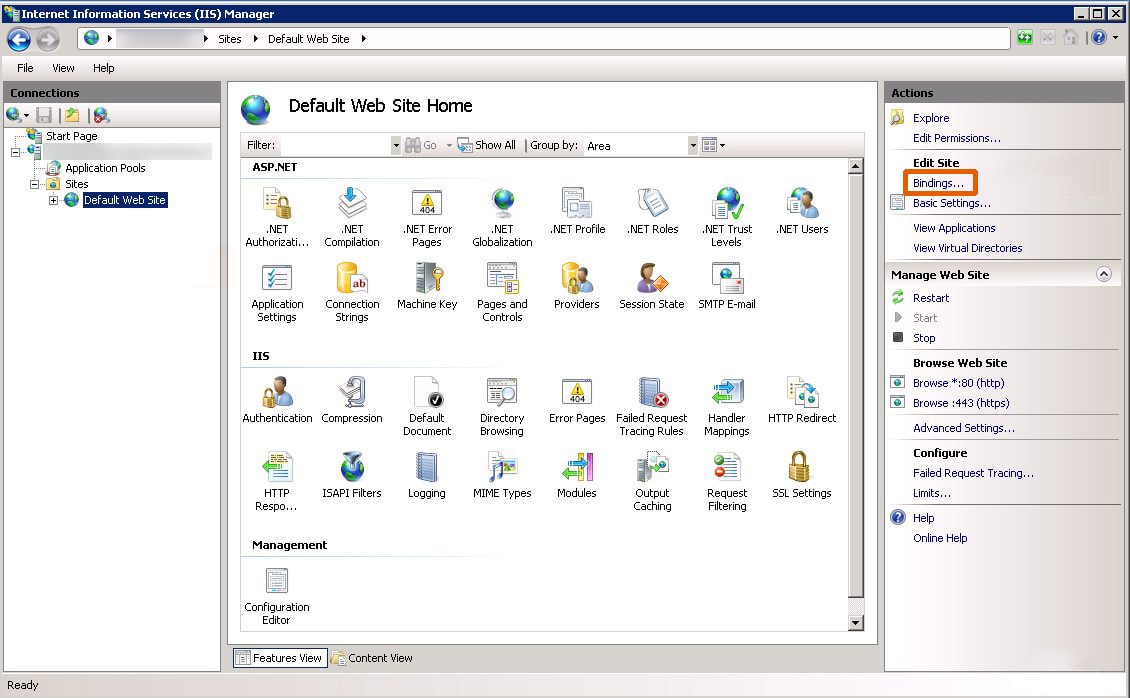
- Now, the Site Bindings window will open up. Click the Add button.
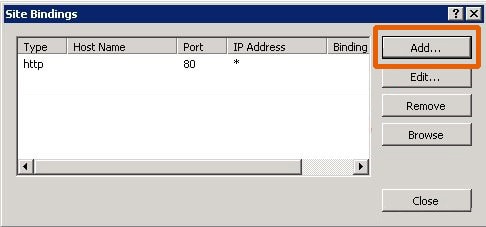
- Now, the Add Site Binding window will show up.
- Enter the details as follows,
- Type: https
- IP address: IP address of your site or All Unassigned
- Port: 443
- SSL Certificate: The certificate that you just uploaded
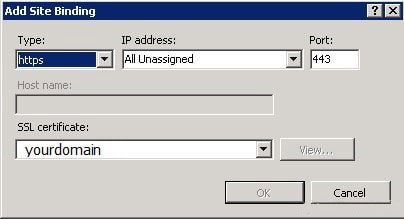
- Click OK button to save changes.
- If the “https” entry is already enabled, and visible in the site bindings area, click and highlight the “https” option. Then, click on the Edit button and, in the SSL certificate area which shows up next, select the Friendly Name that was generated earlier in the previous steps. Then, click OK.
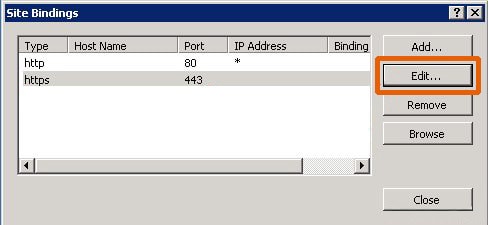
- Click OK on the Site Bindings screen.
- That’s it. You’ve successfully installed the SSL certificate on IIS 7.
- You should restart your website and the IIS to finish the process.
How to install SSL on Amazon EC2
Amazon EC2 is a great way to deploy your websites on the internet. The service provides a scalable, efficient, and performant solution to create and manage virtual machines for hosting your websites. EC2 servers are just cloud computing instances that can host any of the operating systems including Linux and Windows, run Apache, NGINX or other server software, and any additional dependencies based on your preferences.
To install SSL on an Amazon EC2 instance, you can follow the steps given in the Nginx, Apache, or any section above based on the server software you are running on your EC2.
How to install SSL on Ubuntu
Ubuntu is one of the most used operating systems in a server. To install an SSL certificate on Ubuntu, you should first choose a server software such as Apache or Nginx. Then you can follow the steps given in the Apache or Nginx section in this article.
You should also make sure that you have all the prerequisite set on your Ubuntu machine that can be used to generate, manage, and remove SSL certificates. A great example of such a tool is Certbot. You can use Certbot to manage your SSL certificates without breaking a sweat. We highly recommend it, especially if you are planning on getting a free SSL such as Let’s Encrypt. Also, be sure to choose from the best SSL certificate providers.